This program reads your ADIF logbook, and extracts the W1AW/# QSOs into a spreadsheet format by state, mode and band. It shows the date of the last QSO on a given band/mode, so that you can tell if you need to work a station the second time around (this can be changed using the -f option on the command line). Optionally, it will show which band/mode slots have been confirmed via Logbook of the World.
Version 2.6 of the program was released on 21 October 2014. Go to the Version History to download the installation program.
Installation:
After downloading the installation program, simply run it and install the program into a directory of your choosing.
ADIF Requirements
The ADIF QSOs in your log must meet the following criteria:
- Callsign must be logged as W1AW/# (where # is 0-9), or /KG4, /KH0, /KH2, /KH6, /KH8, /KL7, /KP2 or /KP4. All others are ignored
- STATE field in your logbook must be filled in, and exported to the ADIF file (also checks COMMENT field for ADIF files from ADIFMaster)
- The program will automatically filter out QSOs that were not made in 2014 (it will just take longer to run)
- The program will use the LOTW_QSL_RCVD=Y ADIF field (if available) to indicate that a QSO is confirmed
The program does not know which W1AW station was active on any given date, so it's up to your logbook to provide the correct information. The program does not check that the state is valid, i.e. logging W1AW/7 but in Vermont (should be W1AW/1). Again, the program only uses data from your logbook, it does not interpret or extrapolate (or guess).
Operation
To run the program, just double-click on the program icon. You will see a window like the following:
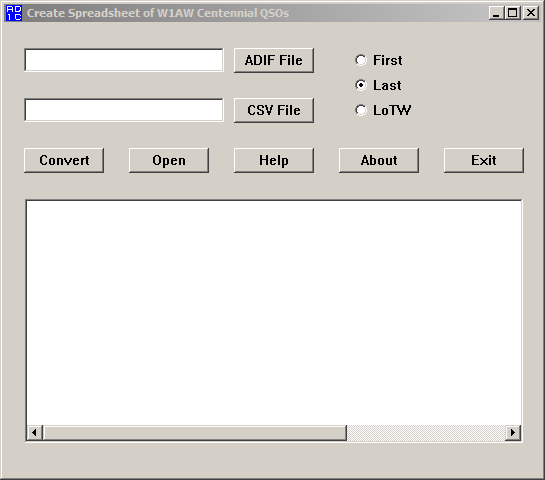
First, click on the "ADIF File" button and navigate to the location of the ADIF (input) file containing your W1AW QSOs. After the file is selected, click on the "Open" button. Your ADIF file should end in ".ADI" or ".ADIF" so the program can find it.
Selecting an ADIF file will automatically populate the CSV (output) file name with the same name as the ADIF file, except with a .CSV extension. If you want to change the output file name, click on the "CSV File" button, and make any changes necessary. Then click on the "Save" button when you are done. The program will warn you if you are about to over-write an existing file.
There are three radio buttons, only one of which can be selected at a time:
First output the date of the first QSO on a given band/mode. Last output the date of the last QSO on a given band/mode. This is the default. LoTW output "LOTW" in place of the QSO date when the QSO is confirmed by LoTW. Otherwise, the date of the last QSO on a given band/mode.
After you have made your selection, if necessary, click on the "Convert" button. This will convert your ADIF file to CSV format. When the conversion is complete, you should see a pop-up window like the following:
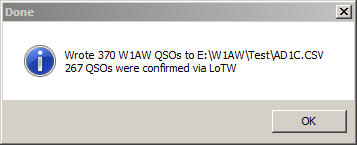
After dismissing the pop-up window by clicking on OK, the main window will look something like this:
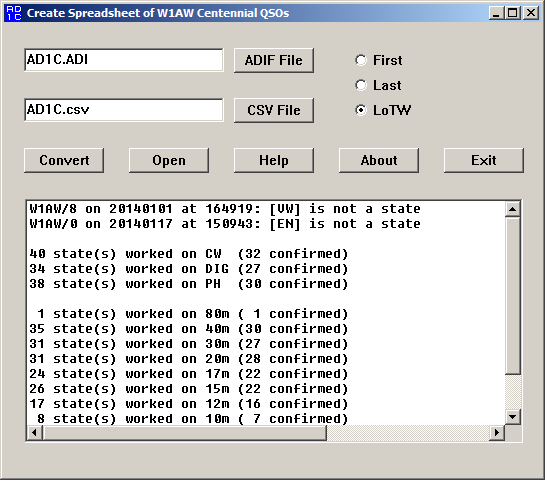
In the example above, there are a couple of error messages about incorrect state abbreviations. Then the program reports the number of states worked on each mode, as well as on each band. You can use the scrollbar to view all of the output.
The function of the other buttons is as follows:
- Open
- opens the converted spreadsheet using your default program in Windows. You can click on this link to see an example of the output.
- Help
- presents this web page in your default web browser
- About
- shows the program title, revision number and date, and copyright information
- Exit
- exits the program
Printing
To print the spreadsheet, try the following tips:
Microsoft Excel 2010/2013
- On the Home tab, select all column headings (A through N) by swiping them from left to right using the mouse
- Click on Format and choose Auto Fit Colum Width (you may want to manually narrow the empty column C)
- On the Page Layout tab, click on Print Titles
- Put a checkmark in the Gridlines box in the Print section
- Click the mouse inside Rows to repeat at top and select row 1 ($1:$1)
- Click OK to exit the Page Setup window
- In the Scale to Fit section of the Page Layout tab, click on the drop-down arrow to the right of Width and select 1 Page
Apache OpenOffice Calc v. 4.1
- Select all column headings (A through N) by swiping them from left to right using the mouse
- From the menu, select Format | Column | Optimal Width, then click OK. Column C (blank) may end up a little wide, you can re-size it if you want.
- From the menu, select Format | Page to open the Page Style window, then click on the Sheet tab
- Put a checkmark in the Grid box in the Print section
- Under Scale, Scaling mode, click on the drop-down arrow and choose "Fit print range(s) to width/height"
- To the right of this, leave "Width in pages" equal to 1, and change "Height in pages" to a large value like 10.
- Click on the Header tab. Uncheck "Header on"
- Click on the Footer tab. Uncheck "Footer on"
- Click OK to close the Page Style window.
- From the menu, select Format | Print Ranges | Edit
- Under "Rows to repeat", type "$1:$1" in the wide box to the right (without the quotes). The narrower box to the left should change to "- user defined -". Click OK
- From the file menu, select File | Print Preview, and verify that the page looks like you want. When satisfied, click on the Printer icon.
Now you can print the spreadsheet.
None of these settings are saved unless you save the document in Microsoft Excel (XLS) format (or equivalent).
Other
If there is an option that you would prefer to be enabled by default when you start the program, you can do so by modifying the Windows shortcut that starts the program. Right-click on the program icon and select Properties. You should see a window like the following:

In the "Target:" box, add "-L" (no quotes, and with a space separating it from the filename) to enable LoTW mode by default. Add "-F" to enable First mode by default. Only add one or the other, not both. Then click on the "OK" button to save the changes.
Future features?
- Print conversion date to spreadsheet (where?)