by
You can import any type of ASCII file (spreadsheet, file from contest software) into DX4WIN after creating a custom filter. As following, step by step, how to do that.
- Open the file containing the data you want to import into DX4WIN into
MICROSOFT EXCEL or other software like that, delete all the columns you
don't want to import, select all the spreadsheet and click on the button
 for that all the text will be left aligned in all columns. Save the file in
text format (separately by spaces). The extension of this file is PRN.
for that all the text will be left aligned in all columns. Save the file in
text format (separately by spaces). The extension of this file is PRN.
|
 |
On the screenshot you can see all the data of each QSO: 21317 is the frequency, SSB is the mode, 2008-03-29 is the date (YYYY-MM-DD), 1150 is the time (HHMM). Don't worry, the order of the data isn't important. You can have the time in first and the callsign in the end or in any another order. |
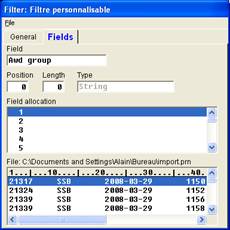 |
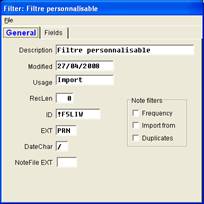
- Now, you must say to DX4WIN which data is on position 1 and which data are on the other positions. In my example there is the frequency on position 1, mode on position 11, date on position 21, time on position 38 (use the right arrow to see all data). For your information the | is position 5 (| between 1 and 10 is 5, | between 10 and 20 is 15) and the zeros are the positions of the numbers (the zero of 10 is position 10, the zero of 20 is position 20). Double click on Field and select the data you want and write the position, the length of the data and the type (double click in the field to see the choices).
In my example it's like that:
|
|
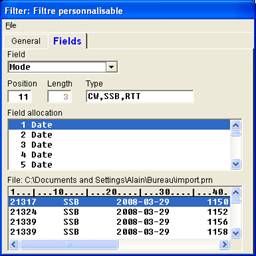 |

And the same for all data (remember to use the right arrow to see all data). In general you must have only one type of data on each position. If you see something like: Callsign Also Date, you probably made a mistake.
|
 |
|
 |
|
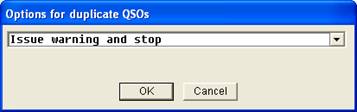
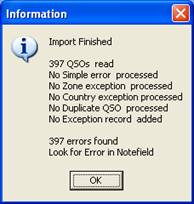
If you get a window like that, you made an (or many) error(s) when you create your custom filter. Hit F8 and write Error in the field Notes for this QSO. In my example I have made an error in the type of data for the band (I have the following text in the field Notes for this QSO: Error: Band=368). Check the type you have selected for this data. |
 |
Tips
- Before I import some data into DX4WIN I create a new log file and I test the import into this new file so, if I have any kind of problem, my logbook isn't affected. When I can see that the import is good, I don't save the test log file and import the data into my logbook.
- Don't worry, you will made some errors when you create your first custom filters but, when you know how doing that, it's very easy and you will see that it's a very nice feature of DX4WIN.