by
updated 19 March 2011
What is a duplicate QSO?
A duplicate QSO is one in which the following fields match another QSO exactly:
- Call
- Date
- Time (including seconds)
- Mode
- Band
- State (if specified)
- County (if specified)
- Grid (if specified)
By process of elimination, this means that the various QSL, LoTW and eQSL fields (Label, Upload, Date, Confirm, Method) are not considered when testing whether two QSOs are duplicates. DX4WIN will keep only the first QSO which exactly matches the fields above (Call, Date, etc.) and discard the rest. This means if the first QSO is not marked with a Label, Confirm, etc. flag, but a subsequent duplicate QSO is, you will not have that status for the QSO that is kept.
How do duplicate QSOs occur?
The most likely cause of duplicate QSOs is that when you first started using DX4WIN, and imported your log from another logging program into your new, empty DX4WIN log, DX4WIN did not check for duplicate QSOs. This is because DX4WIN will only check for duplicate QSOs if there is already at least one QSO in the log. This is why step #4 below is necessary.
You can also manufacture duplicate QSOs by adding two QSOs with the same callsign in real-time, then changing the time of the second QSO to exactly match the first (including seconds), assuming that the date, mode and band are also the same.
Here is one procedure to remove duplicate QSOs from your logbook:
- Make a copy of your log file and store it in a safe place. The file will
usually be named:
<YOURCALL>.dxl
where "<YOURCALL>" is your callsign (without the <>) and will be in your DX4W### "SAVE" directory. One easy way to make a copy of your log is to use File | Save as and save the log file using a different name, or to a different disk. You will need this saved copy of your logbook later.
- Make note of the number of QSOs in your log. From the QSO window, choose
Filter | Count. Write this number down.
- Delete all the QSOs from your logbook. In the QSO window, choose
QSO | Multiple QSO Operations | Delete QSOs. Make sure to
delete them ALL; if you have a filter active, and DX4WIN asks you if you want to
use the filter, answer No. When done, make sure there are no
QSOs in the log.
- Check the QSO tab of your DX4WIN preferences (File | Preferences).
Make sure that the "Group" field is set to 0.
- Add one "dummy" QSO to the otherwise empty logbook. Just enter your own
callsign and then <ENTER> to save the QSO. You will remove this QSO later.
- Save this file. It will contain all your groups and selections. You can use
Filter | Count to verify that the log now contains only one
QSO.
- Import the copy of the log that you saved in step #1 above. From the main
DX4WIN menu, choose File | Import/Export. In the "Import/Export
Filters" window, chooose File | Merge DX4WIN Log:
Navigate to the name of the log file that you saved in step #1 above, then click on the Open button.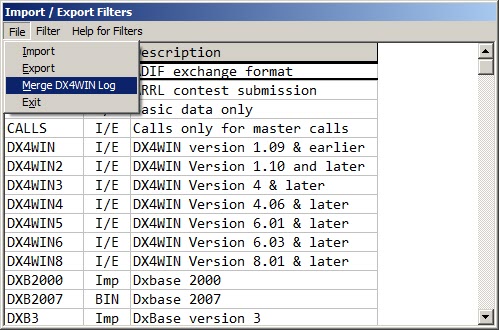
- DX4WIN will prompt you to choose "Options for duplicate QSOs". You should
choose "Imported QSO is ignored", as shown below:
If you want to just check your log for duplicate QSOs, choose "Issue warning and stop" instead. This will stop DX4WIN from merging when it finds the first duplicate QSO. Because this may result in a partial import, you should close the log file (without saving) when done. Don't continue with the following steps, or return to step #3 above.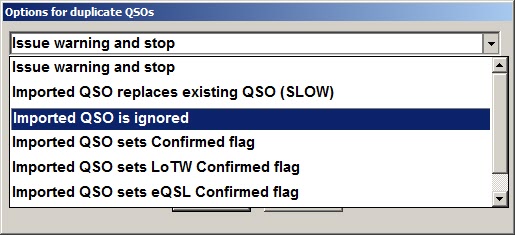
- When the import is complete, DX4WIN will report the number of QSOs that were
imported (the duplicates should have been ignored). Compare this number to the
QSO count you wrote down in step #2 above – it should be less. If it is the
same, one of the following may be true:
- There were no duplicate QSOs in your log
- You forgot to add the dummy QSO in step #4 above. DX4WIN will not test for duplicate QSOs if the log into which you are merging is empty.
- Remove the dummy QSO you added in step #4 above by finding that QSO in your
QSO window, and typing Control-Delete (the delete key that is
next to Insert, End, etc.) to delete it.
- Save your log file.
If there is a problem, you can open the log file you saved in step #1 above and "Save as" using the original name. Then start all over again.